Tischtest · Stand 7. November 2026Bench test · as of 7 November 2026
MessprotokollMeasurement log
Mein Aufbau: Raspberry Pi 5 auf dem Akku-Board UPS HAT (E), 8-Zoll-Display, Audio-Platine reSpeaker Flex XVF3800 mit der linearen Mikrofonleiste (vier Mikrofone). Die Lautsprecher sind noch nicht angeschlossen, die Kabel kommen am 9. November. Das laufende Protokoll führe ich in Issue #18 des Repositorys.My setup: Raspberry Pi 5 on the UPS HAT (E) battery board, 8-inch display, reSpeaker Flex XVF3800 audio board with the linear microphone bar (four microphones). The speakers are not connected yet; the cables arrive on 9 November. I keep the running log in issue #18 of the repository.
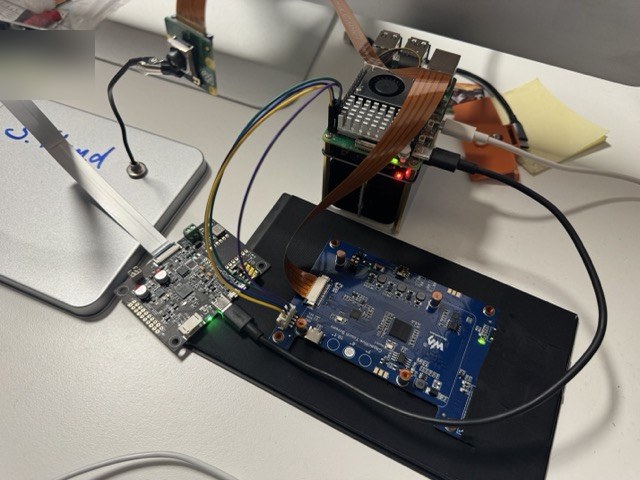
Audio-Platine am Pi, ohne LautsprecherAudio board on the Pi, without speakers
- AnschlussConnectionUSB-A am Pi. An der USB-C-Buchse leuchtet zwar die LED, der Pi erkennt aber kein Gerät.USB-A on the Pi. On the USB-C socket the LED lights up, but the Pi does not detect a device.
- ErkennungDetection
2886:0022 reSpeaker Flex XVF3800 L16K6Ch, USB 2.0 High Speed, angemeldeter Strombedarf 400 mAdeclared current 400 mA - AudioformateAudio formatsAufnahme 6 Kanäle, 16 kHz, nur
S16_LE. Wiedergabe 2 Kanäle, 16 kHz.Capture 6 channels, 16 kHz,S16_LEonly. Playback 2 channels, 16 kHz. - VersorgungPower
throttled=0x0,EXT5V_V5,2 V, ohnewithoutusb_max_current_enable=1 - Ruhepegel (RMS)Idle level (RMS)Kanal 0: −52 dBFS, Kanäle 1 bis 5: −72 bis −76 dBFSChannel 0: −52 dBFS, channels 1 to 5: −72 to −76 dBFS
Klopftest an der MikrofonleisteTap test on the microphone bar
Ich habe mit dem Fingernagel der Reihe nach an jedes der vier Mikrofone geklopft, 25 Sekunden Aufnahme. Dargestellt ist der Spitzenpegel je 100 ms, Skala je Spur −75 bis −8 dBFS. Der Punkt markiert die lauteste Stelle jedes Kanals.I tapped each of the four microphones in turn with a fingernail, 25 seconds of recording. Shown is the peak level per 100 ms, scale per track −75 to −8 dBFS. The dot marks the loudest point of each channel.
Spitzenwert je Klopfer, dBFSPeak per tap, dBFS
| K2 | K3 | K4 | K5 | |
|---|---|---|---|---|
| 1 | −22 | −21 | −18 | −12 |
| 2 | −18 | −21 | −15 | −18 |
| 3 | −19 | −11 | −21 | −18 |
| 4 | −14 | −20 | −17 | −23 |
Jedes Mikrofon ist auf einem eigenen Kanal am lautesten, alle vier funktionieren also, trotz Knick im Flachbandkabel. Welcher Kanal zu welchem Aufdruck auf der Leiste gehört, weiß ich noch nicht. Kanal 0 und 1 reagieren ebenfalls; ihre Bedeutung ist in den Herstellerunterlagen nicht beschrieben.Each microphone is loudest on its own channel, so all four work despite the kink in the ribbon cable. I do not yet know which channel matches which label on the bar. Channels 0 and 1 respond as well; their purpose is not described in the manufacturer's documentation.
BefundeFindings
USB-AnschlussUSB connection
Der Pi hat die Audio-Platine erst erkannt, als ich sie von der USB-C-Buchse an einen USB-A-Port umgesteckt habe. Die USB-C-Buchse liefert hier nur Strom.The Pi only detected the audio board after I moved it from the USB-C socket to a USB-A port. The USB-C socket only supplies power here.
LautsprechersteckerSpeaker connector
Die Buchse SPEAKER hat 2,0 mm Stiftabstand, vermutlich JST PH; der Typ steht nicht in den Unterlagen. Dupont-Stecker passen nicht nebeneinander hinein. Passende Kabel habe ich bestellt.The SPEAKER socket has a 2.0 mm pitch, probably JST PH; the type is not documented. Dupont connectors do not fit side by side. I have ordered matching cables.
12-V-Eingang12 V input
Die Platine hat eine Schraubklemme für 12 V, die ich nicht eingeplant hatte. Der Verstärker (TPA3139D2) ist für 3,5 bis 14,4 V spezifiziert; ob er an USB allein laut genug ist, steht nicht in den Unterlagen. Das messe ich ab 9. November.The board has a 12 V screw terminal I had not planned for. The amplifier (TPA3139D2) is specified for 3.5 to 14.4 V; whether it is loud enough on USB power alone is not documented. I will measure that from 9 November.
Was ich als Nächstes messeWhat I measure next
- LautsprecherSpeakersBetrieb an USB, mit USB-Messgerät; danach Vergleich an 12 VOperation on USB with a USB power meter; then comparison on 12 V
- EchounterdrückungEcho cancellationAufnahme bei voller LautstärkeRecording at full volume
- Gesamtstrom und AkkuTotal current and batteryUnter Volllast mit Gestenerkennung, grobe LaufzeitUnder full load with gesture recognition, rough runtime
- Kamera und SprachwegCamera and voice pathKüchenlicht, Anbindung an ElektraKitchen lighting, connection to Elektra
- MaßeDimensionsAlle Teile vermessen, Werte ins Gehäuse-SkriptMeasure all parts, values into the enclosure script
‹ Zurück zur ProjektseiteBack to the project page · Issue #18 ›